


The App Development Process – A Complete Guide for Non Techies
You may be wondering:
“What’s involved in making an app?”
But if you don’t have much technical knowledge, you may have been reluctant to find out. A lot of information out there is filled with technical terms and jargon, and can be difficult to understand.
But the steps involved in making an app aren’t complex – anyone should be able to understand them.
So in this post, we’ve explained the app development process in a way that anyone can understand.
Reading this guide will help you:
- Select the right development team (and be more confident when doing so)
- Understand the time and resources that you may need to provide to develop the app
- Develop a great app
Developing Software is Like Building a House
If you’ve got some land and you’d like to build a house on it, the first question you’re going to think about is, “Do I want to build a two-bedroom bungalow or a 20-bedroom mansion?”
When a house is built from scratch, an architect is involved at the outset. The architect will draw up detailed plans, make drawings and visual models of what the house will look like. These drawings and models help the client see what the house will be like.
The plans and drawings also help a builder understand what’s involved in building the house. This allows the builder to estimate the price and the time scale to build it.
The plans, drawings, and visual models are absolutely vital when building a house. Think about what would happen if they weren’t produced? You would end up getting a house you didn’t want! That would be pretty expensive and frustrating 🙂

Why is Developing Software is Like Building a House?
Software is almost exactly the same as house building. You have software architects who, similar to building architects, work with their clients to define what’s going to be built. The software architects produce plans and drawings, which are known as wireframes. They can create visual prototypes so the client can see what the end product will look like and how it will function.
Also, similar to the building architect, they will document technical specifications so the software developers can understand what’s needed, and provide a cost and time estimate.
The Eight Steps involved in developing an App
There are 8 steps involved in developing any successful app:
- Defining the requirements
- User experience design
- User interface design
- Prototyping
- Development or coding
- Testing
- App submission and launch
- Post launch
Let’s jump right in.
Step 1: Defining the requirements
This involves taking the idea that you have on paper, or in your head, and translating it into a set of technical requirements that will be used by the software developers.
It fleshes out more detail on how the software should work from a technical perspective. It documents all the functionality the software needs.
For example, it will cover things like:
Do users need to be able to log into the application using their work email address and password?
Do users need to be able to take a photo with their device and upload it via the app to the central database?
Defining the requirements is a step usually performed by the developers or the software architect after initial workshops, meetings and conversations with you. These meetings will help them understand what your idea is, get some more details and translate your idea into technical requirements. Once they’ve got a sense of your idea, the developers can begin on defining a technical solution.
Defining the technical solution means deciding things like:
- What technologies, or software frameworks will be used to develop the software.
- Is a database needed? If so, what type of database? Will it be an Oracle database or a MySQL database or something else?
- Will any third-party software libraries need to be used? For example, if you’re having payments in your software or your app, will you use something like PayPal or Stripe?
All these technical decisions will be made at this stage.
Below we have a picture of a requirements document we recently produced for a client, to give you a sense of what type of information is included.

Step 2: User experience design
User experience, or UX, as it’s known, is one of the most important aspects of developing software and apps.
UX design is defined as, “A process of enhancing user satisfaction with a product by improving the usability, accessibility and pleasure provided in the interaction with the product.”
UX aims to produce a design for the app that is intuitive, easy and simple for your users to use.
UX generally involves three main steps:
- Information Architecture
- Interaction Design
- Wireframing
2.1 Information Architecture
Information architecture is organising and labelling the data in the app to make it easy to use. It’s about how best to connect users to the content.
For example, let’s say you have a list of cities you want the user to select in your app. How should these cities be displayed to the user? Should they be displayed on a map? In a drop-down list? On a search bar so the user has to type in the city that they’re looking for?
Another example is the Spotify app. They have a database of millions of songs. How does Spotify organise their songs to allow a user to find the music they want, quickly and easily? (For a full in-depth analysis of Spotify’s UX design, see an excellent article by Protoypr).
Information architecture also involves labelling the app’s information in a clear way, to allow users to find the information they seek.
An output of the Information Architecture stage is often a flow diagram, showing how the app’s functions might be organised. (An example is shown below from the Prototypr article on Spotify’s UX).

2.2 Interaction Design
The second part of UX design is interaction design. This step makes sure the app gives users a pleasurable experience.
The most common reason for mobile apps not performing well and getting poor reviews in the app store, is that they are difficult or unintuitive for the end user. Therefore, understanding interaction design and getting it right is a very important step.
Interaction design defines how the app should flow to make it easy for users. When I say ‘flow’ I mean the journey or steps the user takes when using the app to complete certain tasks (for example, make a purchase, find and play a song).
For example, to make a purchase, do they first need to sign in and create an account, or do they only need to create an account when they come to checkout?
2.3 Wireframing
The third part of UX design is called wireframing. Once the information architecture and the interaction design is complete, a set of wireframes are produced.
This step is very similar to the building architect’s plans or drawings on a building project. They will produce a set of drawings and plans so you can see what’s going to be built. The wireframes are exactly the same.
To produce wireframes, the software requirements that were defined in step one are studied, and then each screen of the app is sketched out. A flowchart is produced that shows all the screens of the app and how the user navigates through the whole app.
Wireframes are designed in a way that helps the app be really simple and easy to use. Once the wireframes are complete, it helps both client and developer visualize how the app might look, function and how it might flow.
Below is an example of some wireframes.
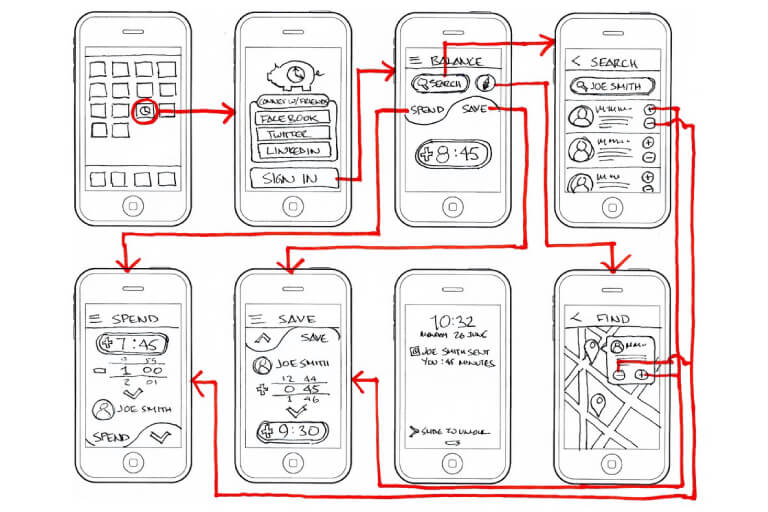
Wireframes can be presented in a variety of ways:
- Sketched out by hand (as in the example above)
- In a PDF document
- Created and then made available on a prototyping platform, such as InVision.
InVision allows the user to see an interactive prototype of the wireframes on a phone. You can press buttons and navigate through the various screens, getting an idea of how it works.
You actually see the wireframes on your phone, and allow you to look at it as though a user would, just to make sure that the flow and everything is right.
Watch the video below to see how an InVision prototype looks:
Step 3: User interface or UI design
UI design is also known as visual design. It’s basically the stage where the app is made to look pretty! It involves creating a unique style and look for the app.
A graphic designer would take the wireframes, give the app the colour scheme, design the buttons, menus, fonts and all the visual elements that make up the app, as well as the app icon.
If you have company brand or style guidelines, these will be incorporated at this stage. Any text or images that you want to have in the app are also added now.

Above, we have an example of the UI design for the Evolve Filter Replacement app from Aqua Optima.
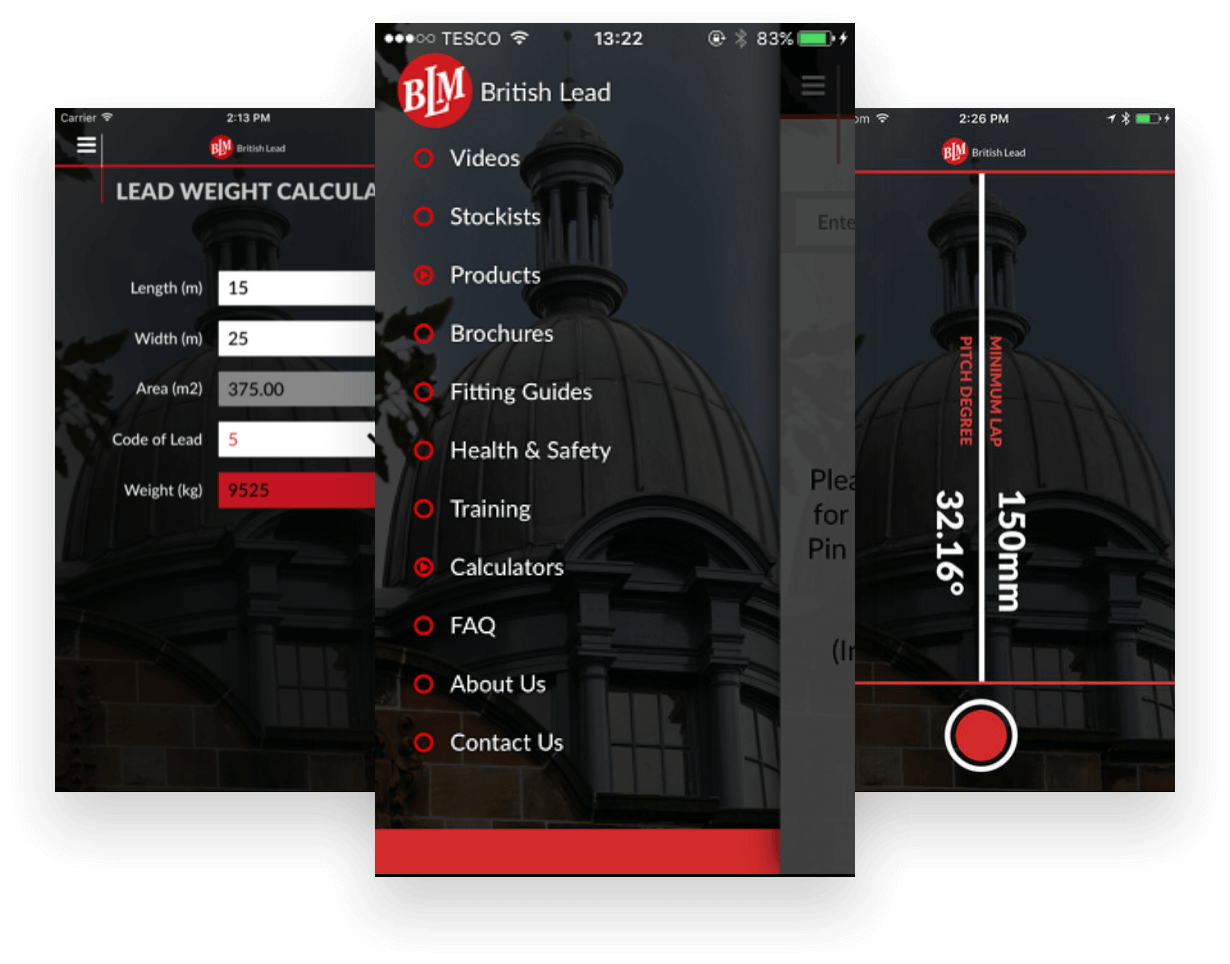
Here is another example, for the BLM Get Lead! app from British Lead.
Step 4: Prototyping
This stage is similar to the building architect creating a 3D house model so the client can and see what their house might look like. After UI design is done, you can, again, put the app designs into a tool like InVision and prototype them and see them on a phone.
You can also show them to potential users to get feedback before the app is built. Feedback from the users is extremely valuable because user feedback might require changes to be made to the designs.
Making changes at this stage is a lot easier, cheaper and quicker than when development starts. For example, when you’re building a house, if you need to change the plans at the architect stage, it’s relatively simple. You just change your drawings, and 3D model. If you need to change your house in the middle of it being built, then it becomes very expensive and difficult.
So, it’s best to get feedback and make changes at this stage.
Step 5: Development and Coding
The prototype’s done, you’ve got feedback from the users, you’re happy, you know what’s going to be built and you’re ready to start building.

This is exactly the same as when builders get on site and start building the house. With app development, this is when developers will start coding. Depending on how complex the app is, this may involve the need to develop a database, an app, a content management system and then linking these things together. This is where the app starts to take shape.
After development of the app is done, you should have a working version of the app. The next stage is to test it thoroughly.
Step 6: Testing
The app is tested to see if there’s any bugs or faults, and that’s its working as expected.

Testing normally consists of a few stages.
The first stage is for the developers to do their own testing. The development company will test the app themselves, internally, and fix any bugs or problems before they send to the client.
When they send it to the client to test, it’s known as UAT or user acceptance testing. UAT testing is your chance to thoroughly test the app before it is submitted to the app stores.
It’s important that you dedicate enough time and resources to test the app because it’s much better for you to find problems than your users!
You should expect to find bugs during this stage. Make sure you document them thoroughly so they can be reported to the developers so they can fix them quickly.
TIP: Use a screen-recording app so you can a video of the problem or the bug on the app itself. Why is this so important?
In order to identify the root cause of a bug, developers will need to replicate it on their own test devices. This allows them to pinpoint the source of the problem. Without this, it can be extremely difficult to locate bugs. So, there’s two things you can do. You can either provide them with a detailed list of written steps on how to produce the bug, writing all the steps that you carried out down, or you can take a video using a screen-recording app.
A screen recording app is obviously a quicker and allows the developers to follow the video, which will help identify the problem and fix it quicker.
Here’s a video on how to perform screen recording on an iPhone:
After UAT is done, and you’re happy with the app, and all bugs have been fixed, the next stage is to submit the app to the app stores.
Step 7: App submission and launch
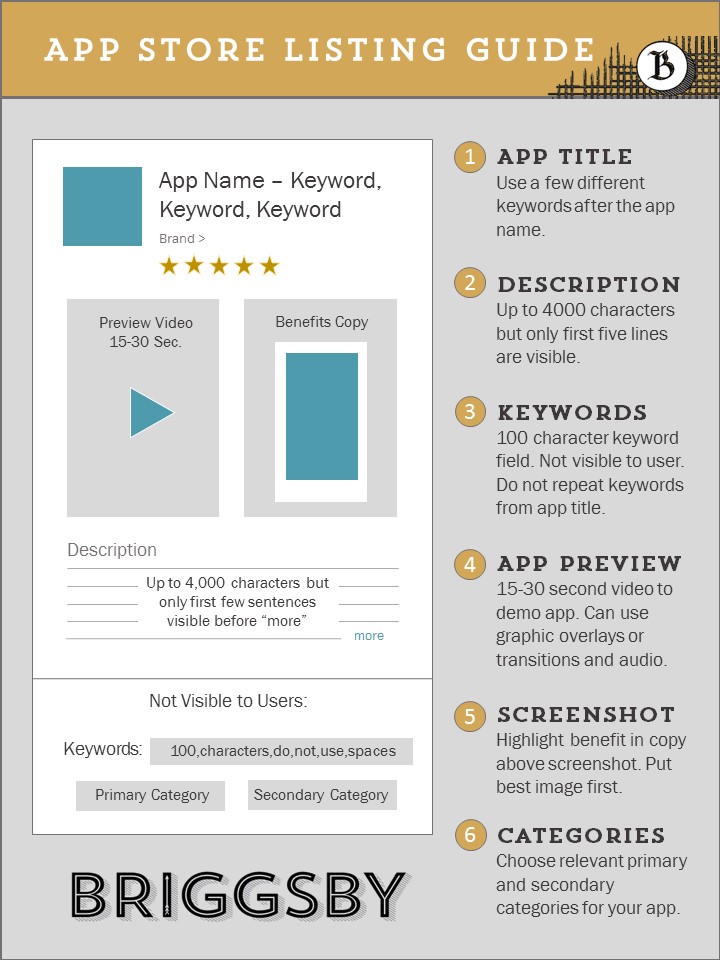
Submission can be usually handled by the developer, but as a customer/client, you’ll need to think about your app store product page. Your product page is your “shop window” where you persuade users to download your app.
![]()
The product page consists of a number of fields – an excellent diagram produced by Briggsby shows all the fields to consider
Questions for you to consider:
- Do you want to include a promotional video?
- When someone sees your app on the app store, what do you want to say to them to grab them and make them download it?
- What screenshots from the do you want to include?
Another great resource that Apple have produced is their App Store Product Page. They have a film where developers share how they get the most out of their product page to encourage users to download their apps.
I just want to talk here about submitting apps to Apple. All apps submitted to Apple are manually reviewed by a human. For example, if you submit your app on a Monday, it might not be reviewed until Wednesday, and then approved on the app store by Wednesday or Thursday. It’s not a perfect system. Apple can sometimes reject an app for no good reason and if they do, that will obviously take extra time to resolve. The reason why Apple will manually review all apps is to make sure that they comply with their guidelines.
Submitting to Google, on the other hand, is different. Apps submitted to Google are not manually reviewed. That means, once you submit your app it will go live within an hour, usually.
Step 8: Post Launch
After the app has been launched, it’s an important keep an eye on the app store reviews to see if users have reported any problems. If problems have been reported, it’s important to get them fixed quickly, and re-submit the app.
Users may also have suggestions for new features or enhancements. It’s good to keep a note of these so they can be added in future.
Also, if you have Analytics set up for your app (which you should), then it’s good practice to monitor these at least weekly initially.
Some key ones to monitor are:
- Downloads
- Installs and Uninstalls
- Number of users
- Daily active users
- App crashes
We’re working on a detailed article on Analytics at the moment, but a good list of KPI’s to monitor can be found on Inapptics website.
Conclusion
You’ve read about the 8 steps involved in developing an app. It’s important for you to be take time during Steps 1 to 4. These steps are key in defining what is going to be built. 2 important things to make sure of during Steps 1-4 are:
- The developers have understood what needs to be built – so you end up getting the app you want
- The User Experience (UX) design is top notch, so that users will love using the app
Getting the initial steps right is key to making sure your app is developed on time, on budget and is a success.
Free In-Depth Consultation
Do you have an app idea that you’re thinking of developing?
We’ve set aside some time to personally review your idea, and provide our expert feedback on it…FREE.
With over 20 year’s combined app experience, we will thoroughly review your idea and:
- Make suggestions on how it can be improved
- Suggest features you may not have thought of
- Inform you of any technical gremlins you need to be aware of (that might cause problems later)
- Provide an estimate on how much it might cost to develop (and how long it will take)
This is a free, in-depth consultation, lasting up to 60 minutes.
If this sounds interesting to you…just click this link here, or click the orange “Book Now” button below.
Then fill in your details, and one of the team will get in touch with you to arrange your Free Consultation.